To maximise overall protection and performance, boat fendering must be installed properly. Are you new to boat fendering installation? Or do you want to brush up on your skills before carrying out a simple replacement? In this post, we’ll cover everything you need to know about correctly installing your boat fendering applications - let’s get started.
We’ll cover:
Resulting Problems of Poor Boat Fendering Installation
Tools and Materials You’ll Need to Install Your Boat Fendering
Accurately Measuring Boat Fendering
Area and Product Preparation
Boat Fendering Installation
Resulting Problems of Poor Boat Fendering Installation
To get the most out of your boat fendering, it must be installed properly. Otherwise, your boat won’t have an adequate level of protection and you could be left wide open to impact damage. For example, if your boat fendering is attached in the wrong position, it won’t provide the protection intended and could leave certain areas of the hull vulnerable.
Should you experience any lasting damage, you’re likely to be faced with expensive repair costs and time out of the water. Neither of these are ideal and are easily avoidable by knowing how to correctly install your fendering applications. Plus, it’s not just the positioning that you need to consider, it’s the number of applications too.
Generally, smaller boats will need fewer fender applications than larger ones. They’re easy to stop and don’t impact with as much force, therefore, fewer fenders are required to safely cushion all collisions.
Tools and Materials You’ll Need to Install Your Boat Fendering
Before making a start on any replacement or maintenance work, you need to ensure that you have the right tools to carry out the job safely and correctly. To successfully install boat fendering, you’ll need the following tools:
Tape measure.
Reversible speed drill.
Putty knife.
Sealant application gun.
Drill bits.
Safety goggles.
Along with the correct tools, you need to make sure that you have all the required materials readily available too. You’ll need:
Fender materials.
Rigid Stainless Steel fixing strips.
Marine-grade adhesive.
Stainless steel screws/bolts.
Rubber cord plugs.
Accurately Measuring Boat Fendering
Before starting any work, you should always make sure that your boat fendering and fixings are measured and cut to length. Also, it’s best practice to pre-drill holes to assist with the location and fitting.
For the most accurate measurements, remove any existing bumpers and take those exact dimensions. That way, you can be confident that these lengths will have already taken into account any potential installation anomalies such as the hull curvature, length and width.
When installing fenders in new locations, measurements need to be accurate. Make sure you consider the holes in which screws, bolts and anchoring points will sit within the fitting.
When measuring, you mustn’t try and cut corners and need to be as accurate as possible. Should you under-compensate with your measurements, your fendering will no longer be suitable for that area of your boat. Sure, you may be able to use it elsewhere, however, if you can’t it’ll be wasted money and the need to repurchase.
Area and Product Preparation
Remove Existing Fenders
When replacing old bumpers and fenders, you must ensure that the existing ones are completely removed from the boat. Once removed, thoroughly clean the area and remove any remaining debris that could cause issues with the fendering installation - this includes any residue of oil and old adhesive.
Dry Installation Run Through
To confirm that you’ve got your measurements right, you should perform a dry run-through of the installation. That way, you can see if fender lengths, hole locations, fixing bars and strips match up with your planned preparation. If not, a dry run through allows you to adequately trim or drill further holes into your fender.
Once you’re confident that everything lines up and will fit, you’re good to go!
Boat Fendering Installation
1. Add the Fixing Strip to Your Fender Length
Run lengths of fixing strip within your fender lengths. From there, accurately line up your holes with their desired location.
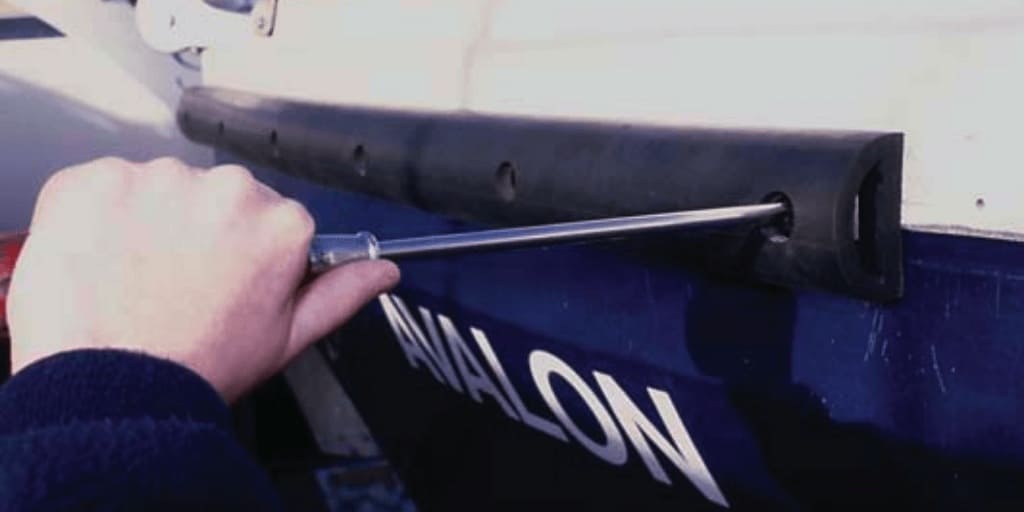
2. Secure Your Fender in Place
While supporting the weight of the fender, pass your screws/bolts through the holes and secure them in place. At this stage, don’t fully tighten - you’ll need to allow for some give while lining up the rest of the holes.
NOTE: Before installation, it’s recommended that sealant is added to each screw/bolt. This helps create an all-important watertight seal around the connection.
3. Secure Additional Bolts
After tightening the first bolt, you can now use this to manoeuvre the rest of the fender length and secure all additional bolts. Simply line up the hole and tighten the bolt - again, don’t fully tighten.
This step will need repeating for the remaining holes on your fender length.
4. Revisit Bolts to Tighten
Now that the full length has been installed, you can revisit each bolt to fully tighten it in place.
5. Repeat for Remaining Fender Lengths
The above four-step process must be repeated for all other fender lengths.
6. Fill in Each Hole
Now that all fender materials are fitted, you can now use your rubber cord to revisit the holes and fill them in.
7. Cut Cord Length and Secure
Once filled in, cut the cord lengths so that they reach the head of the bolt but also cover the opening of the hole.
Once cut to the correct length, these should be secured in place with marine-grade adhesive. Once secured, they can be further trimmed in line with the face of the bumper.
8. Tools Down!
Once you’ve completed the above seven steps, your boat fendering should be securely in place and the installation is complete. Nice job.
Maximise Protection and Longevity With Marine Rubber Fendering
Now that you’re well aware of how to correctly install your desired boat fendering, are you using the correct materials? Marine rubber fendering is by far the most durable and robust manufacturing material - and it can be tailored in many ways to suit your unique needs and requirements.
Choosing the correct materials for your fenders is vital to maximising the protection and longevity of your boat. With that in mind, we’ve created a FREE guide on marine rubber fendering to enhance your overall knowledge. From what it is, who can use it and the benefits it provides, it’s all in there for you.
It’s coming VERY soon - we’re just adding the finishing touches. In the meantime, should you have any questions about marine rubber fendering or installing boat fendering, please don’t hesitate to get in touch. Our expert team is always on hand to help - we look forward to hearing from you!